
After years of working with various CMSs and frameworks, such as Umbraco, Wordpress and Django, where the templating layer is packaged as part of it, I decided to go with a headless CMS for the creation of my new personal website. I wanted to do this for a couple of reasons:
- I've been enjoying my venture into using the JAMStack over the past year and I didn't want to have to manually create the APIs for providing the content to the front end application.
- After working on so many sites over the years, it's clear to see how much reimplementation needs to occur if a component needs to be reused within another project with a completely different CMS. This generally required taking the original HTML and reimplementing the display logic in the new templating language. This is, of course, also the big benefit of React and Vue, but a headless CMS is another piece to this jigsaw*1.
Retrofitting of restful APIs is happening across traditional CMSs, however I wanted to see what new offerings were out there, ones where the headless CMS architecture is at its core. This led me to looking at several headless CMSs, including Contentful, Prismic, StoryBlok and Sanity. Each of which had their own merits. For example, with Prismic I liked the simplicity of the interface, but the fields were restrictive. Then there was StoryBlok which was nice, and one I will be watching, it's great being able to see the changes you're making in real time in an almost WYSIWYG fashion but again, didn't appear to have the flexibility I would want, particularly if creating a more complex project*2.
I was, however, drawn to Sanity, as they provide you with the full source for the 'Studio' where you edit the content, therefore it's very extendable by creating your own React components. Sanity just charge you a fee for the data handling/storage, and do not host the Studio or front end web application for you. There are a lot of great things to say about Sanity, I've tried to cover the main points here and not to go on for too long!
Getting Started
Getting up and running with Sanity was very simple, they have plenty of samples for both React and Vue frameworks, which is great, and the documentation is very readable, with some decent walkthroughs for the more complex, customisable functionality. There were some small frustrations with the examples, such as something as simple as links not working when you added it via their rich text component, where you can add a link in the admin, but it didn't work on the front end.
One of the great parts of getting to know Sanity, was the ability to go through a three step process which got the studio and web application running on Netlify in a matter of minutes.

After completing the setup, you can clone the repository down locally, run it, and everything just works locally out of the box as your data/project IDs have been set up for you. Then, when you make a change, push to master and it's automatically deployed without lifting another finger.
Developer Support
Should you have any issues, whether directly, or indirectly related to Sanity itself, there's a great support team on the Sanity Slack channel. Sanity have support staff manning the chat Monday to Friday, and occasionally someone will pop up at the weekend too. They are very helpful, and it doesn't matter whether you are a paying customer, or just on their free tier, they are there to help you out. They are also actively collecting common problems together, tracking the questions asked in Slack, so that documentation can be improved, or new features added to the Studio too.
They have actually open sourced their tracking system, which they have integrated with Slack, utilising the Sanity CMS of course, this can be found over here.
Sanity in Practice
Once everything is up and running locally, which is done in only a few steps after pulling down an example, you first must define your schemas, these are your data structures for the CMS and defines the fields the user will see within the admin studio.
This was extremely straightforward, and takes a model, code first approach, which I think is great, as this makes the setup source controlled. Here's an example model:
export default {
  name: "hero",
  title: "Hero",
  type: "object",
  fields: [                      // (1)
    {
      name: "blockLayout",
      title: "Block Layout",
      type: "visualOptions",     // (2)
      options: {
       // code shortened for display
      },
    },
    {
      name: "backgroundColor",
      title: "Content Background Colour",
      type: "colors",            // (3)
      options: {
        borderradius: {
          outer: "50%",
          inner: "50%",
        },
        list: colorList,
      },
    },
    {
      name: "image",
      title: "Image",
      type: "image",            // (4)
      options: {
        hotspot: true,
      },
    },
    {
      name: "blockContent",
      title: "Content",
      type: "blockContent",     // (5)
    },
  ],
  preview: {
    select: {
      title: "blockContent",
      imageUrl: "image.asset.url",
    },
    prepare(selection) {        // (6)
      // code shortened for display
    },
  },
}
The above code outlines the structure of a 'Hero' block, which is a component that can be added to a page. Here are a few points about the code above:
- These list the fields that are to be displayed within the admin system
- There are a set of standard types, which will display as a text box, rich text area, drop down list etc. The 'visualOptions' type was a custom control I created for this project, more on that later.
- Community created colour picker
- Built in image type
- This is a separate object I created which wraps around the Sanity 'block' type which is Sanity's rich text editor and uses their custom PortableText format.
- Sanity allows you to decide which parts of the content it should use in the admin, when displaying the title or image for the content block within the admin system, rather than just showing a label of 'Hero'.
Built in and custom validation can also be added to each of the fields accordingly.
Once you've created these objects you create a document type in exactly the same way, but with a type of 'document', for example called 'blogPost' or 'page', you can then set up the side bar of the Sanity studio to list these document types.
I'll not go into detail about the complete setup process as this isn't a tutorial, however, with a bit of 'desk' (their term for the panelling interface) setup, you can something like the following set up with ease:
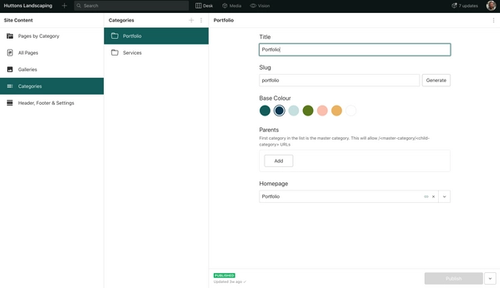
The whole of the area under 'Site Content', and the other panels, are customisable using their structure builder, check out their getting started tutorial if you're curious about what can be done.
Once this is completed, you can go ahead, add content as you please, and then use one of the various Sanity source plugins available for Gridsome or Gatsby (other are available) or using the Sanity client for the likes of Next JS via fetching data within getStaticProps.
And that's Sanity at its simplest level, it's quick and easy to get up and running with overall. So much so, I've been using on another project following the successful implementation for this site.
Noteworthy Features
Plugin Creation
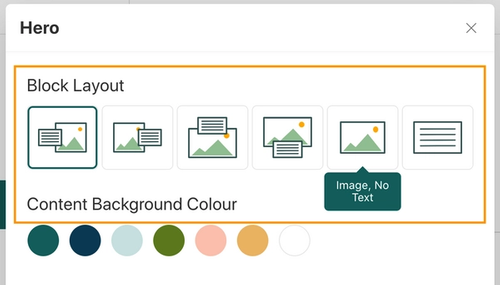
Due to the way the Sanity Studio has built, with extensibility in mind, it's super simple to create a plugin. For the latest project I wanted a way of giving the user options as to how they wanted a content block to display, image above, below, left or right to text. I wanted to do this in a visual way, as I find this is a quicker way of interacting with an interface than with text and a drop down.
Creating a plugin was as simple as creating a standard React component, which updates a value that the studio can serialise. You can also use the studio variables within the CSS to maintain the colours in your component and keep it in keeping with the rest of the Studio.
I have open sourced and published to the NPM repository - source and package.
I've not ventured into customising the desk and other parts of the system, however from reading the documentation, it appears that most of it is extensible should you wish, as everything is created as overridable 'parts'.
Image Manipulation
Sanity provides one of the best online image cropping / hotspotting tools I've seen within a CMS. It allows you to set the crop area, and also then allows you to set an oval hotspot.
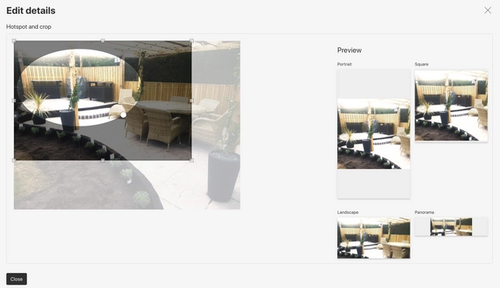
As you can see in the image above, previews are also provided for some common usage dimensions portrait, square, landscape and panorama, so you get a feel for how the image will display depending on the dimensions of the image when added to the site.
Sanity provide a package to allow you to build the URL for the image up, as Sanity do the image hosting for you, they will also return the format that is relevant for your browser, for example, it will return JPG for Safari, as it can't currently handle WEBP. You therefore don't have to worry about image hosting, compression, or format as this is all taken care for you.
Portable Text
Sanity have created their own Portable Text format to represent rich text data, rather than providing preprocessed HTML, more details of which can be found here.
When a user adds content using the built in rich text editor, and this reaches the front end, it's in a JSON format, rather than being HTML. For React and Vue, they then provide a component to help you turn this into HTML/React/Vue components, by providing the component a serialiser, which says "if it is of type X, use Y component, passing it the data". Here's a snippet of code from the serialiser within my latest project:
const serializers = {
  types: {
    block(props) {
      switch (props.node.style) {
        case "h1":
          return <h1>{props.children}</h1>
        case "h2":
          return <h2>{props.children}</h2>
        case "h3":
          return <h3>{props.children}</h3>
        case "h4":
          return <h4>{props.children}</h4>
        case "blockquote":
          return <blockquote>{props.children}</blockquote>
        default:
          return <p>{props.children}</p>
      }
    },
    hero({node}) {
      return (
        <Hero {...node} />
      )
    },
  }
}

const BlockContent: React.FC<Props> = ({ blocks }) => (
  <BaseBlockContent
    context={context}
    className={styles.main}
    blocks={blocks}
    serializers={serializers}
  />
)

export default BlockContent
It's that simple. This then gives you full control on how everything gets displayed rather than relying on a HTML WYSIWYG editor deciding the HTML structure for you.
The Niggles
Of course, no produce is perfect, and Sanity isn't without its issues, but these are really just as the title of this section, niggles. Here are a few of them:
The Examples
As mentioned earlier, examples are sometimes buggy, which can get frustrating as you can start thinking you've broken something, or you're not doing something correctly.
Portable Text Format Queries
For the Portable Text fields, when using GraphQL, you request _rawContent, which then returns to you the JSON structure for the rich text field. If you create a 'mark' or a 'type' to allow a user to, for example, link to other content on the page, or add let us say, an info block with links to other pages, you will just get a field with a reference back within the JSON for those links. Obviously you'll want to get the 'slug' for the page to build up the URL, and I needed the 'slug' and 'category' as well along with its 'slug' to do this.
To obtain the data for you add '(resolveReferences: {maxDepth: 3})' to the end of the _rawContent field, this will resolve references two layers deep. The information you need then gets returned as required, however, this has an issue as it doesn't know what fields you need, it returns the entire document again, when you just need the title and category. Note that at a depth of 3, it will also fetch any documents that it links to as well, and returns them embedded as well.
In some cases, because I've had nested portable text fields, which led me to having to put a maxDepth of 10, in one case. This is not recommended, as then even a 4 page site, when requesting all the content to build the pages in Gatsby, is 250kb. Large sites will therefore fall over with this approach.
In the future I may have to write my own resolver that runs on build, but to me, this is then slightly going against the grain as I'm the creating my own resolver, like me creating my own API endpoints for the older style CMSs like Umbraco.
Number of Requests
One thing I've noticed is that it appears that three requests are sent off to Sanity for each keypress (depending on how fast or slow you type). Authoring an entire article within the Sanity Studio can therefore quickly use up your API requests. It only costs $1 for another 25,000 requests, so it's certainly not the end of the world, but it would be something to be aware of if there's a lot of content authoring going on. After all, Sanity do need to make some money for all the hard work they've put into what they've been doing.
Granular Studio Access
Without going onto a paid plan, which starts at $199 a month, it's not possible to do fine grained user access control. So you can't create a user and allow them to only edit certain content. It's also not clear, even with the paid plan, what access control can even be set up if you do decide to pay. I know that this would certainly put off smaller clients, where they'll be looking to pay more like a quarter of that for their total hosting costs, and still want the granular control.
Directory Structure
Having used Umbraco for years at a web development agency, I do miss the ability to set up any directory structure, and easily retrieve the full URL for a page based on that structure. Only time will tell on how much of an issue this actually becomes.
Summing Up
My general experience of using and extending Sanity Studio has been an enjoyable one, and it's good to be able to have control over the code locally, rather than packaging up and uploading plugins. Sanity definitely shows promise, and the latest project will likely not be the last the I'll be using it for. As with any new technology, there's a learning curve, and I'll need to rethink the approaches used for content building, particularly because of the portable text format issue outlined above.
The support is great, the community friendly, and I'm sure some of these issues will be ironed out in the future.
Finally, it's super cheap for small sites, providing you don't require an SLA or history retention greater than 3 days, however, if you do, it could be a bit prohibitively expensive at $199 a month for small businesses. At which point, a completely self hosted approach like Wordpress or Umbraco might be your best bet still.
Update after writing: Oh the irony... after saying so many great things, I finished this blog post formatting, adding the images, code blocks etc. saved, published, checked locally and all was OK. Went to document list in Sanity Studio, there was an 'Untitled document' that when clicked on was empty. I deleted it. That page was this blog post, the one I'd just spent 30 minutes formatting after copying from Evernote. I'm glad I'd written it in another application first, or I think this review may have been completely different. There is no recycle bin! Once it's gone, it's gone! If I had had the thought that it was this blog post, I would have likely been able to recover it from the page history, but you can't once it has been deleted!
Footnotes:
*1. I'd previously had to implement APIs manually in order to use React components for displaying content, rather than that being the default and thought about from start to finish.
*2. It must be noted that this may be a little bit unfair, as I haven't spent as much time with CMS. You can create custom field types with StoryBlok, but I can only imagine it to be a bit slower and more clunky with the CMS being remote, rather than local where you have all the development tools you need at your fingertips.